Insert, Update in single query Mongodb (NodeJs)

I have started writing tips on my different blog instead of this one. Make sure to follow that one so that you can get latest updates. Here is the link- StackBlogger: Tips and Tricks about Programming

Also follow my another Blog where I write how to make money online, tips about blogging, content creation etc. Here is the link- FlexiPlanet: A hub for Content Marketing.

We will talk about the fastest JSON based database ie MongoDb. The powerful database to handle bigdata now a days which keeps data in JSON format.

Inserting and updating collection in MongoDb using NodeJs in a single command is very easy to do.

db.collection.update(query, update, {upsert: true})

Here db is the mongodb collection instance and query and update objects are respectively the condition and record to update/insert data in collection.

Here you notice {upsert: true} which is passed in the collection update command. This is used to create a new document when no document matches the query criteria.

MongoDB: How to restore and backup MongoDB database.

I have started writing tips on my different blog instead of this one. Make sure to follow that one so that you can get latest updates. Here is the link- StackBlogger: Tips and Tricks about Programming

Also follow my another Blog where I write how to make money online, tips about blogging, content creation etc. Here is the link- FlexiPlanet: A hub for Content Marketing.

Backup and recovery is two most valuable parts in database in case of system failure or unexpected system crash or database replacement.

In MongoDB, data can be import and exported using commands.

Lets move on MongoDB command:

Before starting import and export you need to start mongo using terminal and open a new terminal and navigate to that folder where you want to backup your database.

Open terminal and navigate to that directory where your MongoDB is installed and after that, type below commands.

Backup for one database in MongoDB, execute the below commands.

mongodump --host localhost --port 27017 --db db_name

Where db_name is your database name.

Restore for one database, execute below commands.

mongorestore --host localhost --port 27017 --db new_db_name dump/db_name

Where db_name is your old database name and new_db_name is your new database name.

Backup for total database, execute below command.

mongodump --host localhost --port 27017

Restore for total database, execute below command

mongorestore --host localhost --port 27017  dump

MongoDB: How to repair MongoDB using Command Prompt on unexpected system shutdown.

I have started writing tips on my different blog instead of this one. Make sure to follow that one so that you can get latest updates. Here is the link- StackBlogger: Tips and Tricks about Programming

Also follow my another Blog where I write how to make money online, tips about blogging, content creation etc. Here is the link- FlexiPlanet: A hub for Content Marketing.

First of all lets take a look about MongoDB database. MongoDB is a lightweight and document-oriented language which is built on C++. In this, data are stored in JSON form.

MongoDB can be used in many languages to store data. Among the various languages, there is a good server side language Node.Js in which MongoDB are used.

Now lets move on the issue which occurs on unexpected system shutdown.

I am writing a command and you have to run it using command prompt.

1)  Open Command Prompt by typing “cmd” on “run” and type cd/ to go to the root directory.

2)  Now create a folder “data” in C: directory.

3)  Now type below command in “cmd”

 “Program Files\MongoDB\Server\3.0\bin\mongod.exe” –dbpath C:\data –repair

command

4)  Now click “enter” button and above query will execute and fixed the errors.

Happy coding………..

Node.Js: How to use Session in NodeJs to store information

I have started writing tips on my different blog instead of this one. Make sure to follow that one so that you can get latest updates. Here is the link- StackBlogger: Tips and Tricks about Programming

Also follow my another Blog where I write how to make money online, tips about blogging, content creation etc. Here is the link- FlexiPlanet: A hub for Content Marketing.

As an asynchronous event driven framework, Node.js is designed to build scalable network applications.

Node is similar in design to and influenced by systems like Ruby’s Event Machine or Python’s Twisted. Node takes the event model a bit further, it presents the event loop as a language construct instead of as a library. In other systems there is always a blocking call to start the event-loop. Typically one defines behavior through callbacks at the beginning of a script and at the end starts a server through a blocking call like EventMachine::run(). In Node there is no such start-the-event-loop call. Node simply enters the event loop after executing the input script. Node exits the event loop when there are no more callbacks to perform. This behavior is like browser JavaScript -— the event loop is hidden from the user.

HTTP is a first class citizen in Node, designed with streaming and low latency in mind. This makes Node well suited for the foundation of web library or framework.

According to a survey, it is cleared that PHP is 70% slower tha NodeJs.

Steps to create Session.

1)  First of all, install Client Sessions in your node application. For this, you can go to your directory by using Command Prompt and there copy these lines. npm install client-sessions

2)  Now you have to add this line in your app.js file. var session = require(‘client-sessions’);

3)  Now add below lines in your app.js file at just below to your app variable. It means paste below lines where you have written var app=express();

app.use(session({
cookieName: ‘session’,
secret: ‘jgsdggsdfkbkjbhdjameerkhanjimcute’,
duration: 30 * 60 * 1000,
activeDuration: 5 * 60 * 1000,
}));

4)  Now got to your index.js file which can be found in routes folder and initialize your session variable where you want to store value in session. Such as

var collection=db.get(‘registercollection’);
collection.findOne({name:name,password:password},function(err,user){
if(user){
req.session.user=user;
res.redirect(‘/’);
}

5)  Now modify your router page on which you want to show the session value. Such as

router.get(‘/’, function(req, res, next) {
if(req.session && req.session.user){
res.render(‘index’, { title: ‘Express’ ,username:req.session.user.username});      }
else{
req.session.reset;
res.redirect(‘/login’);
}
});

6)  And now you can access your session on your jade page by writing this line.

h1 Hello, #{username}

Enjoy coding…………..

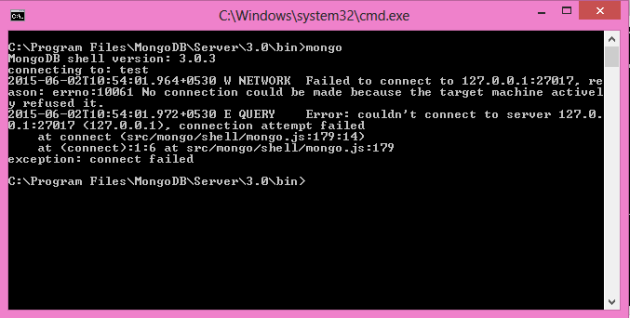
Unable to connect to server 127.0.0.1:27017: No connection could be made because the target machine actively refused it 127.0.0.1:27017.

I have started writing tips on my different blog instead of this one. Make sure to follow that one so that you can get latest updates. Here is the link- StackBlogger: Tips and Tricks about Programming

MongoDB is a lightweight database which can be widely used in NodeJs applications to store and retrieve data.

If you are facing this error, the follow the steps and you will be able to run your MongoDB on your system.

mongo_error

mongo_unable_to_connect

If you are facing this type of problem in Windows 8, then you do only these:-

Go through these steps and you can definitely run Mongo on your Windows 8 OS.

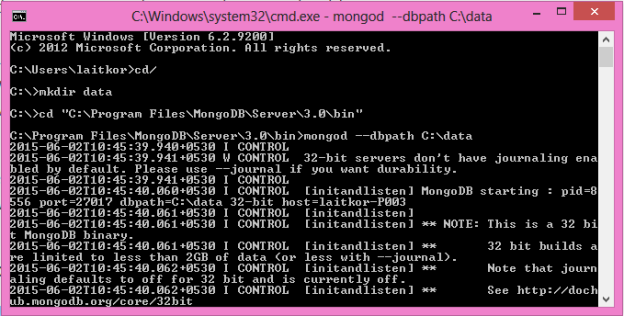
1)  Create a directory in C:. In my case: Data.

And open CMD and type:-

cd/

mkdir data

cd “C:\Program Files\MongoDB\Server\3.0\bin”         If your system is x86 and your using latest MongoDb.

mongod –dbpath C:\data

step1

2)  Now open another CMD and type:-

cd/

cd “C:\Program Files\MongoDb\Server\3.0\bin”

mongo

Now you will look like this.

step2

Your MongoDB database is now running.

Social Bookmarking Sites List

Improve your website backlinks. Here are FREE high DA and PR Social Bookmarking Sites List.

Enjoy…………..